You create interactive movies by setting up actions—sets of instructions that run when a specific event occurs. These events can be when the playhead reaches a frame, or when the user clicks a button or presses keys on the keyboard.
Now you'll add actions to the buttons to make the appropriate text content appear when the buttons are clicked.
Modify the instances of the text symbols
Because actions can only target movie clip symbols, you begin by changing the instances of the text symbols that you just added into movie clips and giving them names. In the next section you use these names to identify the instances as targets of an action. Begin with the TEXT - CONTACT instance.
| 1 | Make sure the Text Contact layer is still selected in the Timeline, and then double-click the TEXT - CONTACT symbol instance on the Stage to open the Instance Properties dialog box. |
| 2 | Click the Definition tab, and then click Movie Clip as the behavior. |
| Notice that an Instance Name field appears under Instance Options. | |
| 3 | Enter "Contact" as the instance name and click OK.

|
Now, change the instance of the TEXT - HOME symbol.
| 1 | In the Timeline, click the visibility controls to hide the Text Contact layer and show the Text Home layer. |
| Remember that the visibility controls for each layer are in the column below the eye icon in the Timeline. | |
| 2 | Select the Text Home layer in the Timeline, and then double-click the instance of the TEXT - HOME symbol on the Stage to open the Instance Properties dialog box. |
| 3 | Click the Definition tab, and then click Movie Clip as the behavior. |
| 4 | Enter "Home" as the instance name, and click OK. |
Add an action to the BUTTON - HOME button
Now you can add an action to the BUTTON - HOME button that displays the Home text and hides the Contact text when the button is clicked.
The buttons should still be disabled so that you can select them and make changes.
| 1 | Choose Control > Enable Buttons and make sure that Enable Buttons is not checked. |
| 2 | Make sure the Buttons layer is selected in the Timeline and unlocked, then double-click the BUTTON - HOME button on the Stage to open the Instance Properties dialog box. |
| 3 | On the Actions tab, click + (plus) and choose Set Property from the pop-up menu. |
| 4 | Choose Visibility from the Set pop-up menu. |
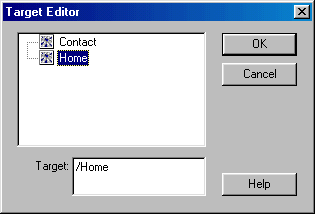
| 5 | Click the button to the right of the Target box and choose Target Editor from the pop-up menu.

|
| 6 | In the Target Editor, double-click Home to select it as the target, and then click OK.

|
| 7 | In the Value box on the Actions tab, enter 1. |
Now, add a second statement that hides the Contact text.
| 1 | Click + (plus) and choose Set Property again from the pop-up menu. |
| 2 | Choose Visibility from the Set pop-up menu. |
| 3 | Click the button to the right of the Target box and choose Target Editor from the pop-up menu.

|
| 4 | In the Target Editor, double-click Contact to select it as the target, and then click OK. |
| 5 | In the Value field, enter 0 (zero). |
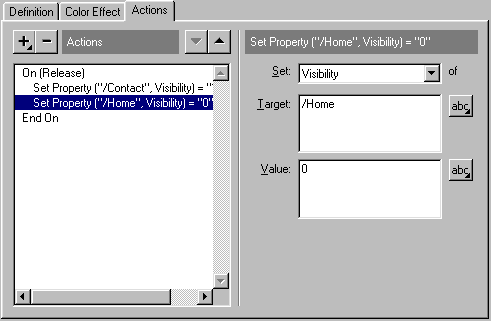
The action for BUTTON - HOME should look like this:

|
|
| If you make a mistake, you can click the minus button (-) to remove the selected line in the action and then re-create the statement. You can also choose Edit > Undo. | |
| 6 | Click OK to close the dialog box. |
Add an action to the BUTTON - CONTACT button
Now give the BUTTON - CONTACT button an action that displays the Contact text and hides the Home text.
| 1 | Double-click the BUTTON - CONTACT button on the Stage to open the Instance Properties dialog box. |
| 2 | On the Actions tab, click + (plus) and choose Set Property from the pop-up menu. |
| 3 | Choose Visibility from the Set pop-up menu. |
| 4 | Click the button to the right of the Target box and then choose Target Editor from the pop-up menu.

|
| 5 | In the Target Editor, double-click Contact to select it as the target, and then click OK. |
| 6 | In the Value field on the Actions tab, type 1. |
Now, add a second statement that hides the Home text.
| 1 | Click + (plus) and choose Set Property again from the pop-up menu. |
| 2 | Choose Visibility from the Set pop-up menu. |
| 3 | Click the button to the right of the Target box and choose Target Editor from the pop-up menu.

|
| 4 | In the Target Editor, double-click Home to select it as the target, and then click OK. |
| 5 | In the Value field, enter 0 (zero). |
The action for BUTTON - CONTACT should look like this:

|
|
| 6 | Click OK to close the dialog box. |
Hiding layers in the Timeline has no effect on content when you run the movie outside of the authoring environment. To hide both the Home and Contact text when the movie starts, add a frame action to the movie.
| 1 | Create a new layer in the Timeline and name it "Frame Actions." |
| 2 | Double-click the first frame in the Frame Actions layer to open the Frame Properties dialog box. |
| 3 | Click the Actions tab and choose + (plus), and then choose Set Property from the pop-up menu. |
| 4 | Select Visibility from the Set pop-up menu. |
| 5 | Click the button to the right of the Target box and choose Target Editor from the pop-up menu.

|
| 6 | In the Target Editor, double-click Home to select it as the target, and then click OK. |
| 7 | In the Value field on the Actions tab, type 0 (zero). |
Now, create a new statement in the action by copying the existing statement.
| 1 | Press Control+C (Windows) or Command+C (Macintosh) to copy the first statement in the action. |
| 2 | Press Control+V (Windows) or Command+V (Macintosh) to paste a copy of the statement into the window. |
| This creates a copy of the line you just created. You only need to change the target. | |
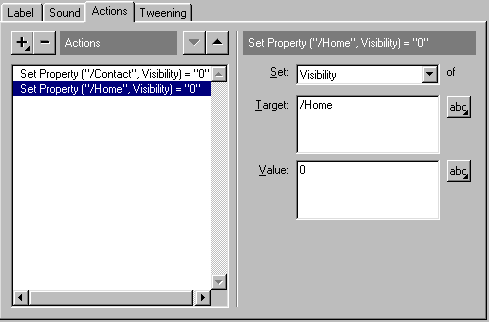
| 3 | Use the Target Editor to change the target from Home to Contact. |
The action should look like this:

|
|
| 4 | Click OK to close the Frame Properties dialog box when you're done. |
| At this point, you are done with the content of the movie. Your movie should look like the Tutorial Finish.fla example. | |
Now that the movie content is complete, you can test the movie to see all of its features.
| 1 | Choose Control > Test Movie. |
| 2 | While testing the movie, enter some data in the Contact fields. Enter more than one line in the Comment field to see the lines word wrap.

|
| 3 | Choose Control > List Variables to display the Output window. |
| 4 | Click Send to see it how the variables work. |
The Output window displays the data that Flash sends to the server.

|
|
| A functioning application would require additional actions, such as an action that clears the fields after sending the data, but this example should give you a basic understanding of how you can use Flash to send data to a server. | |
| 5 | Close the Output window, and then close the window in which the movie is playing. |
| You're now ready to publish the movie. | |